Showing posts with label Desert. Show all posts

Tuesday, June 21, 2016

Raspberry Chocolate Cupcakes

It has been quite some time since I have put up recipes but this one was too good not to post.  This past Sunday was Father's Day and we enjoyed spending time with my Father-in-law.  We spent the day relaxing and the boys did some house work, but in the middle of the day we decided we had to make a desert.  After playing 10 questions we decided on a chocolate and fruit combination.  Joe did some research and this is the recipe we settled on.  This has to be one of my all time favorite recipes.  It turned out perfect with a couple tricks here and there.  It's not the easiest recipe but definitely worth taking the time to make it.  With it being summer time, raspberries are super sweet and the flavors are amazing!  Enjoy!

Ingredients

For the Cupcakes:

1 1/2 cups all-purpose flour
1/2 cup granulated sugar
1/2 cup brown sugar
3/4 teaspoon baking soda
1/4 teaspoon salt
4 tablespoons butter, cut into cubes
2 ounces semi-sweet baking chocolate, chopped
1/4 cup cocoa powder
1/2 cup boiling water
1/2 cup buttermilk
1/3 cup sour cream
1 teaspoon vanilla
2 large eggs

For the Frosting:

1/2 cup fresh raspberries
1/2 cup butter
4 ounces cream cheese
3 1/2 to 4 cups powdered sugar
1/4 teaspoon vanilla

For Ganache:

1/2 cup whipping cream
4 ounces semi-sweet chocolate

For Garnish:

15 raspberries

Directions

For the Cupcakes:

Preheat oven to 350 degrees F. Line a muffin tin with 12 to 15 cupcake liners.
Mix flour, sugars, baking soda, and salt together and set aside.
Place butter, chocolate, and cocoa together in a bowl and pour boiling water on top. Cover with plastic wrap and let sit two minutes. Mix until smooth and then add in the buttermilk, sour cream, eggs, and vanilla. Mix the liquid ingredients into the dry until smooth.
Pour 1/3 cup batter into each paper liner. Bake for 20-25 minutes or until toothpick comes out clean. Leave cupcakes in tin for 5 minutes before removing onto a cooling rack. Meanwhile, prepare the frosting and ganache.

For the Frosting:

Puree the 1/2 cup raspberries in a food process, blender, or with a hand blender. If you blend more then you will simply need to add more powdered sugar until frosting is desired consistancy.
Beat butter and cream cheese together until smooth. Add powdered sugar a little at a time while beating and cream for 2-3 minutes. Add raspberry puree and vanilla and beat until completely combined. Add more powdered sugar to bowl if you feel like the icing is not thick enough.  Place frosting into a pastry bag fitted with a piping tip.  If you feel the icing is runny, place in fridge for 10 minutes.

For the Ganache:

Heat whipping cream in the microwave for 40-60 seconds until hot.  Place chocolate in a bowl and pour hot whipping cream on top. Let it sit for two minutes and then stir until smooth.  Let the ganache come to room temperature (about 10-15 minutes) before applying to cupcakes. If you would like for it to thicken more you can put it in the fridge but make sure to mix periodically so it does not harden.

To Assemble:

Once the cupcakes have cooled, spoon 1-2 teaspoons ganache onto each cupcake, spreading it to almost the edge of the cupcake. Pipe frosting on top of each cupcake and then spoon 1 teaspoon over the top and press a berry in. Serve immediately. Cupcakes with berries on that are not eaten within a few hours should be refrigerated. Another option is to store the cupcakes at room temperature in an air tight container and add the raspberries just before serving.

Monday, December 14, 2015

Salted Caramel Chocolate Fudge Cake

It has been quite a long break since I last wrote what we were eating and what I was baking.  Life seems to be incredibly busy and always moving forward.  We have traveled to NYC and Chicago to visit friends and family, made it through Thanksgiving, and are gearing up for Christmas!  It seems like there is never a break to breath!

This past weekend we had a beautiful reason to celebrate.  Joe's Men's ALTA tennis team won the championship a couple weeks ago!  This has been a long time coming since they have gotten so close so many times!  After an exciting finish, it was only appropriate to celebrate.  We had his team over to our place this past Friday night to celebrate the big victory.  No celebration is complete without a cake.  So, of course I gave Joe some options for cakes.  He managed to pick the most complicated one!  I was in a time crunch as well since I had traveled the end of last week, but it was all worth the stress!  So, be warned this isn't the quickest cake to make, but it is well worth it!  So, here we go!

Salted Caramel Chocolate Fudge Cake

Cake
2 cups plain flour
1 3/4 superfine sugar
2/3 cup cocoa powder
1 1/2 tsp baking powder
1 1/2 tsp baking soda
2 eggs
1 cup + 2tsp buttermilk
1/2 cup + 1tsp vegetable oil
2 tsp vanilla extract
1 cup + 2tsp very hot coffee

Salted Caramel
1 1/2 cup super fine sugar
1/4 cup water
1 cup + 3tbsp double cream
2 tbsp unsalted butter
1/2 tsp - 1 tbsp sea salt flakes

Swiss Meringue Buttercream
1 cup superfine sugar
4 large egg whites
1 cup + 1 tbsp softened unsalted butter
1 tsp vanilla extract
8 tbsp (or more to taste) salted caramel

Whipped Ganache
7 oz dark chocolate
3/4 cup + 1tbsp + 1tsp double cream

Note: I made superfine sugar by processing granulated sugar in a food processor for about a minute

Instructions
  1. Bake the cake the day before you want to ice it. Preheat the oven to 180°C/350°F/Gas mark 4. Grease and line two 20cm/8in round tins.
  2. Sift the flour, cocoa powder, baking powder and bicarb of soda together into a large bowl, stir in the sugar. In a separate bowl, whisk together the eggs, buttermilk, oil and vanilla extract, pour into the dry ingredients and beat well until smooth and combined. Add the hot coffee, a little at a time, until it is all combined, the mixture will be very liquid, don't panic! Divide the batter between the tins and place in the centre of the oven, check after 35 minutes - a skewer inserted into the centre should come out clean or with a few moist crumbs, but no wet batter. They could take up to an hour to bake though, mine took 55 minutes, just check every 5-10 minutes after the 35 minute mark.
  3. Once baked, remove to a wire rack, still in their tins, and leave to cool completely. Once cold, wrap the cakes in their tins in clingfilm and place in the fridge overnight, or for at least an hour. It is far easier to slice a cold cake in half neatly.
  4. Make the salted caramel: Place the sugar and water into a deep, heavy-bottomed saucepan, bring to the boil and cook, swirling the pan, NOT stirring, until the sugar dissolves and the colour changes to amber. Remove from the heat and pour the cream - be careful as the caramel will bubble ferociously and rise up in the pan. When the bubbling stops, add the butter and whisk till combined, it may not be completely smooth at this point.
  5. Return the pan to a medium heat and cook at a gentle simmer, whisking the whole time, for a couple of minutes until the caramel is smooth and free of lumps. Whisk in the salt, a little at a time, tasting as you go (CAREFULLY - the caramel is very hot!), until it's at the right level of saltiness for you. Make sure that the salt is actually fully combined, and not just sinking to the bottom, before adding more. Leave the caramel to cool completely, it can be made the day beforehand and stored in the fridge for up to a week.
  6. To make the salted caramel swiss meringue buttercream, put the egg whites and sugar in an extremely clean heatproof bowl (use the bowl of your stand mixer if you have one). Place over a pan of simmering (not boiling) water (do not let the base of the bowl touch the water) and whisk with a hand whisk (not electric) until the sugar has dissolved completely and the mixture is warm to the touch, if you rub some of the mixture between your fingers it should be smooth and you shouldn’t be able to feel any graininess, this will take about five minutes. If you want to get technical about it the mix should reach 60°C/140°F on a thermometer.
  7. Remove the bowl from the heat and attach it to your stand mixer with the whisk attachment or use an electric hand whisk, whisk the egg whites until it forms a thick, glossy, bright white meringue and is completely cool, the bottom of the bowl should feel cool to the touch, this will take about 10 minutes.
  8. Once the meringue is cold, switch the mixer to a low speed and begin to add the butter, a tablespoon at a time, make sure that each addition is fully incorporated before adding the next; the meringue will deflate a little and may begin to look curdled, don’t panic! This is normal, just keep adding the butter gradually and whipping away and it will come back together. If, once all the butter has been added, your mixture is runny, the butter may have been too soft or the meringue still warm, just put the bowl in the fridge for 15 minutes or so then carry on whipping.
  9. If, even after a decent amount of whipping, it still looks curdled, place about 4 tablespoons worth of the mixture in a small bowl and microwave for 10-15 seconds, it should become runny, pour this back into the bowl of buttercream, down the side of the bowl while whisking, continue to whisk for a few minutes and it should come back together. Once the buttercream is completely smooth and silky and all the butter has been incorporated, whisk in the vanilla extract and salted caramel.
  10. Remove the cakes from the fridge and carefully, using a long, sharp serrated knife (like a bread knife) slice each one in half so you have four layers. Place one layer on a serving plate or cake stand and spread over just over a quarter of the buttercream, then drizzle over a tablespoon or two of the salted caramel (you can thin it with a little more cream or warm it VERY slightly until it becomes pourable if needed - I'm talking no more than 10 seconds in the microwave, do not let it become warm or it will melt the buttercream). Top with another layer of cake and repeat until you have three layers of buttercream; place the final layer of cake on top - use one of the bottom halves, upside-down, so that you have a flat top.
  11. Spread the remaining scant quarter of buttercream thinly all over the cake, it does not need to be neat and you will be able to see cake through the buttercream but try to get it fairly smooth and cover the cake evenly; this is your crumb coat - it will stop cake crumbs from getting into your ganache. Place the cake in the fridge for at least fifteen minutes while you make the ganache.
  12. To make the ganache, chop the chocolate and place in a heatproof bowl. Put the cream in a small pan and heat until just simmering, pour it over the chocolate, making sure that it is all covered; leave to stand for 5-10 minutes then stir until smooth. Leave the ganache until it has cooled to room temperature - it should have thickened but still be spoonable, like pudding (you can pop it in the fridge to speed this up). Whisk with an electric whisk until it has lightened in color and has the texture of thick whipped cream, do not over-whip or you will end up with chocolate butter...which sounds delicious but is not what we want here! Immediately spread the ganache all over the cake - work fairly quickly as it doesn't take long for it to start to set.
  13. To finish, drizzle over the remaining salted caramel.

Photo and recipe from here

Thursday, June 11, 2015

Homemade Peanut Butter Oreos

So if you don't know yet, Oreos now have a peanut butter (Reeses) flavor, and it is amazing!  Really anything with peanut butter and chocolate is going to be amazing, but when I came across the below recipe I just had to try it!  I was worried the cookies wouldn't be symmetric and make bad sandwiches, but honestly they were super easy and turned out perfect! The cookies turned out perfect and remained super soft even after a couple of days.  If you love peanut butter and chocolate as much as I do there are the perfect desert.  It makes the prefect batch to share if you have a small dinner party like we did and didn't have too many leftover to share!

Homemade Peanut Butter Oreos

Ingredients

    Cookies

  • 1/3 cup Hershey’s Special Dark unsweetened cocoa powder (you can use regular unsweetened but they won’t be as “Oreo” like)
  • 1/2 teaspoon baking soda
  • 1/4 teaspoon salt
  • 1 1/4 cups all-purpose flour
  • 1/2 cup butter, softened
  • 2/3 cup brown sugar
  • 1/4 cup granulated sugar
  • 1 teaspoon vanilla
  • 1 large egg
  • Filling

  • 1/2 cup unsalted butter
  • 1 cup creamy peanut butter
  • 1/4 teaspoon salt
  • 3 cups powdered sugar
  • 1 teaspoon vanilla extract
  • 2-3 tablespoons heavy whipping cream

Instructions

  1. Preheat oven to 350°F. Line two cookie sheets with parchment paper or silicone baking mats.
  2. In a medium bowl, whisk together cocoa powder, baking soda, salt, and flour. Set aside.
  3. In the bowl of an electric mixer fitted with the paddle attachment, cream butter and both sugars. Mix in egg and vanilla and mix until smooth. Add dry ingredients and mix until combined.
  4. Scoop 2 tablespoon sized balls of dough onto the cookie sheets. You will get about 15-17 cookies. (Alternately, you can use 1 tablespoon sized balls of dough and get twice as many cookies. Baking time will be less.)
  5. Bake for 8-9 minutes until they just lose their glossy sheen. Err on the side of underdone for these cookies; they taste better that way. Let cool completely before filling and making sandwiches.
  6. To make the filling: beat butter and peanut butter in the bowl of a stand mixer fitted with the paddle attachment. Mix in salt, then slowly beat in powdered sugar. Add vanilla, then 2 tablespoons of cream. Add a third tablespoon of cream as needed for the consistency you want. Note: this makes a lot of frosting, more than you need. It is enough frosting to fill the 2 tablespoon sized cookies OR the 1 tablespoon sized, plus extra. Filling can be frozen in an airtight container for up to one month.
  7. Once cookies are cooled, frost half with the frosting and sandwich with the other half. The best way to do this is to place your frosting in a gallon size ziploc bag and cut off one tip. Place a very large squeeze of frosting in the center of the bottom of a cookie, then press the top cookie on top, causing the frosting to spread to the edges.
 
Original Recipe and Image found here

No Bake Oreo Cookie Dough Bars

It's officially mixed tennis season which gives me a wonderful excuse to make deserts for tennis.  I love making deserts for tennis because I get to bake some goodies then take them out of the door so that we aren't tempted to eat all of them!  We have some friends coming into town so I also wanted to have some goodies to share with them while they stay with us.  I actually doubled this recipe below to make a bigger batch so that we would definitely have enough.  It was super simple and quick to do since you didn't have to bake anything!  Enjoy!

No Bake Oreo Cookie Dough Bars

Ingredients

Oreo Crust:
  • 38 Oreo Cookies, crushed in crumbs
  • 7 Tablespoons Unsalted Butter,melted 
Cookie Dough Layer:
  • 1 Stick Unsalted Butter, softened
  • ¾ Cup Brown Sugar, firmly packed
  • 2 Teaspoons Vanilla Extract
  • 2 Cups All-Purpose Flour
  • 1 (14 oz.) Can Sweetened Condensed Milk
  • 1 Cups Semi-Sweet Chocolate Chips
Optional Toppings:
  • 2 (4oz.) Hersheys Cookies and Cream Bars, melted
  • 5-6 Oreo Cookies, crumbled
  • Cookie Dough Balls, recipe follows

Instructions

  1. Oreo Crust: Line an 8x8 pan with foil. Set aside. In a bowl combine the Oreo cookie crumbs and melted butter. Stir with a fork until well combined and the mixture resembles damp sand. With your hand or the back of a glass, firmly press the Oreo mixture into the prepared pan. Place in the freezer to chill while you prepare the cookie dough layer.
  2. Cookie Dough Layer: In the same bowl you used for the Oreo crust, cream the butter for 1 minute with a hand mixer. Add in the brown sugar and beat for an additional 2 minutes on medium speed. Beat in the vanilla extract. Slowly add in the flour, alternating with the sweetened condensed milk. Stir in the chocolate chips. Reserve ½ cup of the cookie dough. Press the cookie dough on top of the prepared Oreo crust. Return to the freezer to chill for 30 minutes. Roll the remaining ½ cup of cookie dough into mini balls (it is easier and less sticky if you allow the dough to cool down a bit). Place in the freezer to firm up. Remove bars from the refrigerator and pour the melted cookies and cream bars evenly over the top of the bars. Top immediately with cookie dough balls and crushed Oreo cookies. Refrigerate for 1-3 hours. Cut into 12 squares and serve.

Original recipe and picture found here

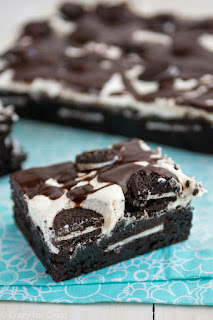
Cookies ‘n Cream Extreme Brownies

Cookies ‘n Cream Extreme Brownies

Ingredients:

For the Brownies:

  • 2 sticks (1 cup) unsalted butter
  • 1 1/3 cups semi sweet chocolate chips
  • 4 large eggs
  • 2 cups granulated sugar
  • 1/4 teaspoon salt
  • 1 1/2 teaspoons pure vanilla extract
  • 1/4 cup + 1 tablespoon all purpose flour
  • 1/4 cup + 2 tablespoons unsweetened cocoa powder
  • 15 Oreo Cookies

For the Fluffy White Frosting:

  • 8 tablespoons vegetable shortening (Crisco)
  • 1 stick (1/4 cup) unsalted butter, softened
  • 1 cup marshmallow fluff
  • 3 teaspoon pure vanilla extract
  • 1 1/4 cups powdered sugar

Topping:

  • About 1 1/4 cups (or more to taste) Oreo Mini Cookies
  • 2 tablespoons unsalted butter
  • 2 tablespoons light corn syrup
  • 1/2 cup semisweet chocolate chips
  • 2 teaspoons very hot water

Directions:

  1. Preheat oven to 350°F. Line a 9x13” pan with foil and grease with butter or spray with cooking spray.
  2. Melt butter and chocolate chips in microwave until creamy and smooth. Set aside.
  3. Whisk the eggs in a large bowl. Add the sugar and salt and whisk until incorporated. Gradually whisk the chocolate mixture into the egg mixture. Whisk in the vanilla.
  4. Place the flour and cocoa in sifter or a wire mesh strainer. Sift directly into the batter and stir with a spatula. Pour batter into prepared pan and spread until even. Place the 15 large Oreos evenly on top and press down lightly to cover with the batter.
  5. Bake for 30-35 minutes until a toothpick inserted in the center comes out clean. Cool to room temperature on the counter, then cover and let sit overnight (you can also refrigerate it overnight).
  6. Make the frosting: beat shortening and butter in a stand mixer with the paddle attached (or a hand mixer). Mix in marshmallow creme and vanilla. Slowly mix in powdered sugar. Spread frosting evenly over top of the brownies. Top evenly with mini Oreos.
  7. Make the topping: melt the butter and corn syrup in a small saucepan. Turn off the heat and stir in the chocolate chips, then stir in the water to thin. Drizzle over the top of the frosting. Chill the frosted brownies for at least 1 hour until the frosting and topping sets. Remove from pan and slice into bars. 
Original Recipe and Image Found here


Tuesday, April 28, 2015

Chocolate Peanut Butter Torte

As you all know, I love having people over for dinner.  It gives us a perfect excuse to cook and bake.  We had not had Joe's best friend and girlfriend over for dinner in a while so we were excited to fire up the green egg and make beer chicken and brats.  We have now had the green egg for a couple months and are obsessed.  I will have to get better at keeping track of the recipes we have done but we use it at least a couple times a week!  For the party, I wanted to make a desert.  Since there was a handful of people, I thought a cake would be perfect!  It is quick and easy to make and we absolutely loved eating it!  Enjoy!

Chocolate Peanut Butter Torte

Ingredients

For the crust:
32 Oreo cookies, finely processed into crumbs
5 1/3 tbsp. unsalted butter, melted and cooled
Small pinch of salt
For the crunch:
½ cup salted peanuts, finely chopped
½ cup mini chocolate chips
2 tsp. sugar
½ tsp. espresso powder
¼ tsp. ground cinnamon
Dash of ground nutmeg
For the filling:
2 cups heavy cream
1¼ cups confectioners’ sugar, sifted
12 oz. cream cheese, at room temperature
1½ cups creamy peanut butter (not natural)
2 tbsp. whole milk
¼ cup salted peanuts, finely chopped
For the topping:
½ cup heavy cream
4 oz. bittersweet chocolate, finely chopped
1 cup  salted peanuts, finely chopped
1 cup chocolate chips, chopped

Directions

  • To make the crust, preheat the oven to 350° F. Butter a 9-inch springform pan and place it on a baking sheet. Combine the Oreo crumbs, melted butter and salt in a small bowl. Toss with a fork to moisten all of the crumbs. Press into a thin layer covering the bottom and sides of the springform pan. Freeze the crust for 10 minutes. Bake in the preheated oven for 10 minutes, then transfer to a wire rack and let cool completely before filling.
  • To make the crunch, in another small bowl combine ½ cup of the chopped peanuts, mini chocolate chips, sugar, espresso powder, cinnamon and nutmeg. Toss with a fork to mix and set aside.
  • To prepare the filling, in the bowl of a stand mixer fitted with the whisk attachment, whip 2 cups of the cream until it holds medium peaks. Beat in ¼ cup of confectioners’ sugar and whip until the cream holds medium-firm peaks. Scrape the cream into a separate bowl and refrigerate until needed.
  • Wipe out (do not wash) the mixer bowl, replace the whisk with the paddle attachment, and beat the cream cheese with the remaining 1 cup of confectioners’ sugar on medium speed until the cream cheese is satiny smooth. Beat in the peanut butter, whole milk, and ¼ cup of the chopped peanuts until well combined.
  • Using a large rubber spatula, gently stir in about 1/4 of the whipped cream just to lighten the mousse. Still working with the spatula, stir in the crunchy peanut mixture, then gingerly fold in the remaining whipped cream. Scrape the mousse into the crust, mounding and smoothing the top. Refrigerate for at least 4 hours or overnight; cover with plastic wrap as soon as the mousse firms.
  • To finish the torte, put the chopped chocolate in a heatproof bowl set over a saucepan of simmering water. Leave the bowl over the water just until the chocolate softens and starts to melt, about 3 minutes; remove the bowl from the saucepan. Bring the ½ cup of cream to a full boil. Pour the cream over the chocolate and, working with a rubber spatula, very gently stir together until the ganache is completely blended and smooth.
  • Pour the ganache over the torte, smoothing with a metal icing spatula. Scatter the peanuts and chocolate chips over the top and chill to set the topping, at least 20 minutes. When the ganache is firm, remove the sides of the springform pan. Refrigerate until ready to serve.
Original Recipe from here

Brasstown Valley

A couple weeks back my mother in law celebrated her 60th birthday!  Since 3 out of the 4 DiDias have birthdays at the end of March, we normally celebrate them together.  Since this was a big birthday for my mother in law, my father in law planned a weekend getaway.  We made the trip up to Brasstown Valley, GA the first weekend of April.  We left on Saturday after Joe finished tennis and started the day with a vineyard tour at Crane Creek Vinyards.  Although we have done plenty of tastings, we had never done a full tour!  It was absolutely amazing to see all the work that goes into making wine!  After that, we headed to the lodge where we were staying for the night.  We enjoyed some appetizers and drinks at the bar before doing dinner at the lodge.  Since it was Easter Weekend, there was a prime rib buffet for dinner that everyone else did, and I enjoyed an appetizer since I was still full.  After that, we watched some basketball by the first then headed to bed.  Sunday we woke up and enjoyed some donuts before heading out to church.  After church it was time for brunch!  The lodge had such an amazing Easter brunch!  We started with the fish, there was oysters, smoked salmon, ravioli, and mahi mahi.  Then we had some cheeses and meats.  We followed that with some lamb, waffles, and sausages.  There was so much good food, and then topped that with desert!  Needless to say we were stuffed!  After brunch we slowly headed back to Atlanta.  
For the occasion I made made an amazing cake!  We brought the cake for dinner on Saturday and it turned out amazing.  It isn't the fastest thing to make, but it was totally worth it!  Below is the recipe. 

Lemon Blueberry Meringue Cake

Ingredients
    For the Baked Meringue Swirls/Discs:
  • 3 egg whites 
  • 3/4 cup sugar
  • A drop soft gel paste color, yellow
  • For the Lemon Curd:
  • 4 lemons (or 6 Meyer lemons)
  • 2 whole eggs plus 4 egg yolks (set whites aside for buttercream)
  • 1 cup sugar
  • 4 tablespoons unsalted butter, at room temperature
  • For the Lemon Swiss Meringue Buttercream:
  • 7 egg whites
  • 1-1/2 cups  sugar
  • Pinch of salt
  • 2 cups unsalted butter, softened and cut into cubes
  • 1/4 cup lemon curd
  • 1 teaspoon pure vanilla extract
  • Few drops of soft gel paste colour, yellow
  • For the Lemon Cake:
  • 3/4 cup unsalted butter, softened
  • 2 cups sugar
  • 6 eggs, separated
  • 2 cups all-purpose flour
  • 3/4 teaspoon baking soda
  • 1/2 teaspoon salt
  • 2 tablespoons lemon juice
  • 2 teaspoons pure vanilla extract
  • 1/2 teaspoon lemon extract
  • 2 tablespoons lemon zest
  • 3/4 cup plain yogurt, at room temperature
  • baked meringue swirls, for decorating
  • lemon drop candy, for decorating
  • 2 cups blueberries
Instructions
    For the Baked Meringue Swirls/Discs:
  1. Preheat oven to 200°F. Line two baking sheets with parchment paper and set aside. Wipe the bowl of an electric mixer and the whisk attachment with paper towel and lemon juice, to remove any trace of grease.
  2. Add egg whites and sugar to the mixer bowl and fit onto the top of a medium saucepan filled with about 1-inch of simmering (not boiling) water. (Be sure the bottom of your bowl is not touching the water.) Whisk constantly but gently, until temperature reaches 140°F, or if you don’t have a candy thermometer, until the sugar has completely dissolved and the egg whites are hot.
  3. Dry the underside of the mixer bowl and transfer to your stand mixer. Whip using the whisk attachment until the meringue is thick and glossy and has reached the stiff peak stage.
  4. While the meringue is whipping in the mixer, fit your decorating bag with a plain round pastry tip. Fold over a cuff at the top of the pastry bag and paint 3, equally-spaced, thin lines of yellow gel colour using your fine paint brush (you can use any paint brush, but it should only be one you designate for food) from the pastry tip up toward the cuff.
  5. Fill the bag with your meringue (no more than 2/3 full) and pipe 1-1/2-inch swirls onto one of the lined baking sheets, spacing them about 1-inch apart. (These will be used to decorate top of cake). On the second baking sheet, pipe the remaining meringue into flat discs, about 2-inches in diameter, spacing them about 1" apart. (These will be used on top of the filling inside the assembled cake.)
  6. Bake for 60 minutes, rotating the trays after 30 minutes. Lower the oven to 175°F and bake until dry, about 40 minutes more. Keep in an airtight container until needed.
  7. For the Lemon Curd:
  8. Wash lemons really well (with a bristled brush under cold water) and using a zester, remove all of the coloured portion of the peel from the fruit (not the white pith–it’s bitter!) into a bowl or onto a piece of wax paper. Rotate fruit as necessary to get as much of the zest off. Repeat until you have 2 teaspoons (30 ml) of the zest, and set aside.
  9. Slice the lemons in half crosswise (I find room temperature citrus is best for juicing) using a sharp knife, and extract as much of the juice as you can using a citrus reamer, or I use a small, manual citrus juicer. (Just be sure to catch all of the juice in a bowl and to completely strain the seeds before using.) Repeat the juicing until you have 2/3 cup (160 ml) of the strained juice.
  10. Get your double boiler ready by filling a saucepan with 1″ of water, then placing a metal bowl on top of the saucepan. You will need to ensure the bowl fits snugly into the top of the saucepan and that the bottom of the bowl doesn’t touch the water (important, or your eggs will cook). You can now remove the bowl and continue with making the curd.
  11. Whisk the juice, whole eggs, egg yolks and sugar in the bowl until smooth. Add the butter cubes to the bowl, but don’t stir.
  12. Heat the water in the saucepan over low heat until it simmers (not boils) and place the bowl atop the rim. Stirring gently, but constantly, using heatproof spatula or wooden spoon, cook until the curd has thickened and all of the butter has melted and is incorporated, about 10 minutes (this can vary). To test if the curd is thick enough, remove the spatula or spoon from the curd and check that it’s coated.
  13. Strain the curd over a bowl using a fine-mesh sieve and then stir in the zest. Cover with plastic wrap pressed directly against the curd (to prevent a skin from forming) and chill for at least 3 hours (I like to chill it overnight). It also thickens up a bit more while chilling. Keep refrigerated.
  14. For the Lemon Swiss Meringue Buttercream:
  15. Wipe the bowl of an electric mixer with paper towel and lemon juice, to remove any trace of grease. Add egg whites, sugar and salt, and simmer over a pot of water (not boiling), whisking constantly but gently, until temperature reaches 160°F, or if you don't have a candy thermometer, until the sugar has completely dissolved and the egg whites are hot.
  16. With whisk attachment of mixer, begin to whip until the meringue is thick, glossy, and the bottom of the bowl feels neutral to the touch (this can take up to 10 minutes or so). *Don't begin adding butter until the bottom of the bowl feels neutral, and not warm.
  17. Switch over to paddle attachment and, with mixer on low speed, add butter cubes, one at a time, until incorporated. Increase mixer speed to medium and whip until it has reached a silky smooth texture (if curdles, keep mixing and it will come back to smooth). *If mixture is too runny, refrigerate for about 15 minutes and continue mixing with paddle attachment until it comes together. Add lemon curd and vanilla, continuing to beat on medium speed until well combined. Add yellow soft gel paste colour until desired shade of yellow is achieved.
  18. For the Lemon Cake:
  19. Preheat oven to 350°F (180°C). Grease, line with parchment and flour three round 8-inch pans. I use Parchment Paper Circles for ease. In the bowl of a mixer fitted with the paddle attachment, cream butter and 1 cup (200 g) of the sugar on medium high speed until very pale and fluffy, about 5 minutes. In a medium bowl, sift flour, baking soda and salt. Set aside.
  20. Lower mixer speed to medium low and add the egg yolks, one at a time, scraping the sides of the bowl with a rubber spatula after each addition. Add lemon juice, vanilla, lemon extract and lemon zest and beat until incorporated, about 30 seconds. With mixer running, add dry ingredients. Add yogurt, scraping down the sides of the bowl to make sure everything is well incorporated. Coat blueberries with flour then add blueberries to cake mix.  Mix until they are Incorporated.
  21. In another grease-free bowl, (or if you're lucky enough to have another mixer bowl) whip egg whites and remaining cup of sugar until they reach stiff peak stage. Fold meringue into batter until just combined, and divide batter evenly among the three prepared pans. Use a digital kitchen scale to weigh pans to ensure even layers, if possible (425 g of batter for each layer).
  22. Bake first two layers 2" apart in center of oven on top of a baking sheet until a cake tester comes clean when inserted into the center, about 25 minutes. Be careful to not over-bake -- check cake at 20 minutes, but not before, and once you feel it’s almost ready, set the timer for 2 minute intervals. Repeat with final cake layer. Let cool on racks for 10 minutes before loosening the sides with a small metal spatula, and invert onto greased wire racks. Gently turn cakes back up, so the tops are up and cool completely.
  23. Wrap tightly and store at room temperature for up to 2 days, refrigerator for up to 5 days, or frozen for up to 2 months. Best enjoyed day 1 or 2.
  24. Assembly of the Lemon Delight Layer Cake:
  25. Trim any doming or top crust and side crust from cake layers using a very sharp serrated knife (I use the Mac Bread Knife for all of my cake trimming, splitting, etc.).
  26. Use a cake turntable for filling, frosting and decorating, if a possible. Place a small dollop of frosting in the center of a cake plate or 8″ round thin foil-covered cake board, and place the bottom cake layer on top, trimmed side up (face up).
  27. Pipe a dam (a rim around the top perimeter of the cake layer) of lemon curd buttercream around the cake layer using a large round Pastry Tip fitted inside a Decorating Bag. Then pipe another smaller circle of buttercream a few inches toward the center. Spoon lemon curd into the open spaces and spread evenly with a small offset palette knife, taking care to keep the curd within the dam (otherwise it will ooze out of the sides of the cake). Gently place cover the filling with a layer of the flat baked meringue discs, breaking them into smaller pieces if necessary to cover most of the layer.
  28. Repeat with second cake layer and more buttercream, lemon curd and meringue discs. Place final cake layer, trimmed side down. Look straight down from above cake and be sure the layers are all lined up, shifting gently if necessary. Cover with plastic wrap and chill for at least 30 minutes.
  29. Remove from fridge and put a generous scoop of buttercream on top, spreading evenly with a small offset palette knife and working your way down the sides until you have a thin layer of frosting over the entire cake (crumb-coat). Chill until set, another 30 minutes.
  30. Remove from refrigerator and covering the cake in another layer of buttercream, but this time using a thicker layer of buttercream and creating a smooth finish.
  31. For the top of the cake, using your decorating bag fitted with the large round tip , 2/3 full with buttercream, pipe 8 small swirls, evenly spaced. Top each swirl with a baked meringue swirls, and fill the spaces in between with lemon drop candy. Gently spoon a layer of lemon curd on top of the cake, using a toothpick to pull the curd to the inside edges of the candy and swirls.
  32. Store finished cake covered in refrigerator (due to the lemon curd filling), but serve at room temperature (you can remove from refrigerator several hours ahead of serving).
Notes
*You can make the baked meringues up to a few weeks in advance, keeping them in an airtight container at room temperature.
**You can make the lemon curd up to a month ahead, keeping it in an airtight container in freezer.
***You can make the Swiss meringue buttercream up to a month ahead, storing it in an airtight container in freezer, bringing to room temperature on counter the night before needed. 
Photo and original recipe from here


Thursday, December 18, 2014

Cookie Dough Brownie Cake

I love making cakes, but there aren't too many occasions when you get to make one!  Joe's father's birthday was is a perfect time to make a wonderful cake since we always go up to the cabins to enjoy his birthday weekend.  This time around, Joe picked the cake, so of course it is going to have chocolate incorporated in it!  The cake turned out beautiful and was actually quite simple to make!  I forgot to take a good picture of it so you will see the picture from the page where I got the recipe!  Enjoy!

Cookie Dough Brownie Cake
Ingredients
Brownie Cake:
  • 1 and ½ cups vegetable oil
  • 3 cups sugar
  • 3 teaspoons vanilla extract
  • 6 eggs
  • 1 and ½ cups flour
  • 1 cup cocoa powder
  • ¾ teaspoon baking powder
  • ¼ teaspoon salt
Cookie Dough Filling:
  • 3 sticks unsalted butter, at room temperature
  • ¾ cup light brown sugar, packed
  • 3 and ½ cups confectioners’ sugar
  • 1 cup all-purpose flour
  • ¾ teaspoon salt
  • 3 Tablespoons milk
  • 2 and ½ teaspoons vanilla extract
Ganache Frosting:
  • 4 ounces semi-sweet chocolate, finely chopped (or use chocolate chips)
  • ½ cup heavy whipping cream
  • ¼ cup light corn syrup
  • 2 teaspoons vanilla extract
  • Extra chocolate chips, for garnish
Directions
Brownies:
  1. Pre-heat oven to 350 degrees (F).
  2. Prepare three 8-inch round baking pans with cooking spray and parchment.
  3. In a large bowl, combine sugar and oil. Stir with a large wooden spoon until completely combined.
  4. Add eggs one at a time, stirring and incorporating each completely before adding another.
  5. Add vanilla, stir to combine.
  6. In a medium bowl, combine dry ingredients (flour, cocoa powder, salt and baking powder.) Whisk to combine.
  7. Add dry ingredients a little bit at a time, stirring until just absorbed each time. I added mine in 3 batches. Do not over-mix, just stir until dry ingredients are fully incorporated.
  8. Pour batter evenly into three prepared pans.
  9. Bake for 20-25 minutes, or until a toothpick comes out with wet crumbs.
  10. Cool completely, then remove from pans and set aside.
  11. Prepare filling.
Cookie Dough Filling:
  1. In a large bowl (I used my stand mixer) beat butter and brown sugar until light and fluffy.
  2. Add confectioners' sugar, and beat to combine.
  3. Add flour and sugar, beat until combined.
  4. Add milk and vanilla, beat until light and fully.
Ganache Frosting:
  1. In a medium glass bowl, heat heavy cream in the microwave until steaming hot but not boiling, about 45 seconds. (Microwaves vary, so just watch yours carefully.)
  2. Remove hot cream from microwave, and pour chocolate chips into the cream.
  3. Allow to sit for 30 seconds, then slowly stir with a rubber spatula until cream and chocolate fully combine, and chocolate melts completely.
  4. Stir in corn syrup and vanilla, and again stir until completely combined. Set aside while you assemble the cake.
Assembly:
  1. Place one layer of brownie cake on your serving platter. Spoon about 1 cup of frosting over the top of the cooled cake, and spread just to the edge of the cake.
  2. Place another layer on top of the first. Press down slightly to secure.
  3. Spoon another 1 cup of frosting over the top of the layer, and spread just to the edges of the cake.
  4. Spoon remaining frosting into a piping bag with a star tip for decorating.
  5. Place top layer of cake over the frosting. Press down slightly to secure.
  6. Place cake in refrigerator for 10 minutes.
  7. Remove chilled cake from refrigerator. Slowly pour about ½ cup of ganache over the top of the cake, and using an offset spatula, slowly spread it to the sides of the cake, just barely pushing it over the edge. Add more ganache until you reach your desired coverage.
  8. Place cake back in refrigerator for 20 minutes to allow ganache to firm up.
  9. Pipe decorations around cake, sprinkle with chocolate chips and drizzle with leftover ganache.
  10. Enjoy!

Tuesday, December 16, 2014

Holiday Sweets

Every year, the holidays bring a great opportunity for me to bake all day and then give the goodies away.  I love baking, but often times they sit in the house and we either eat them all (which just isn't healthy) or they go to waste.  Every year for the holidays, I try to take the time to bake some goodies to bring into the inside team at work, to show my appreciation for all that they do for me throughout the year.  This year was no different, and this past Sunday was filled with a grocery run in the morning, and baking the remainder of the day!  Below are all the recipes that I put together to put on a platter to deliver to my company, and Joe's company.  There were a couple old recipes that I made that I will provide links to below.  Enjoy!

Soft and Chewy Chocolate Chip Cookies
White Chocolate Cream Cheese Cookies
Smores Fudge Bar

One more thing I made was chocolate covered pretzels.  They are so simple to make and make for a quick desert!  All you need are Pretzel Rods or Sourdough Pretzels , melted chocolate (white, dark, or milk) and some sprinkles for any occasion!

Finished Platter

Hot Cocoa Fudge

Ingredients
  • 3 cups milk chocolate chips
  • 1 14 oz can of sweetened condensed milk
  • 1 tbsp cocoa powder
  • 2 tsps vanilla extract
  • 1 cup marshmallow bits or marshmallow minis
Instructions
  1. Line a 9 by 9 inch pan with aluminum foil.
  2. Over medium low heat, add the sweetened condensed milk to a small saucepan. Whisk in the cocoa powder.
  3. Stir in the chocolate chips and stir consistently until well combined. Stir in the vanilla extract.
  4. Pour into the pan, and add the marshmallow bits, gently pressing them into the fudge.
  5. Refrigerate for at least four hours, covered, before removing the fudge from the pan by lifting the aluminum foil, peeling it off the fudge, and cutting the fudge to serve.
  6. Store in an airtight container at room temperature for up to two weeks.
Original Recipe from here

Cookies and Cream Fudge

Ingredients:

3 cups white chocolate chips, melted and cooled
8 ounces cream cheese, softened
1 stick unsalted butter, softened
1 teaspoon vanilla extract
2 cups powdered sugar
26 Oreo cookies, crushed

Directions:

Line a 9-by-13-inch pan with parchment paper. Lightly spray the parchment with baking spray or grease with butter. In the bowl of your stand mixer attached with the paddle attachment, beat cream cheese and butter until smooth. Add vanilla and mix until combined. Slowly add the powdered sugar until thoroughly combined. Mix in the melted chocolate until the mixture is light and fluffy, about 1 minute.
Stir in the crushed Oreo pieces.  Spread the mixture evenly into your prepared pan. Refrigerate for at least 2 hours. Cut into 1-inch cubes. Store in an airtight container in the refrigerator until ready to serve.

Original recipe from here 

Double Decker Chocolate Peanut Butter Fudge

Ingredients:
1 (10-12 oz) bag peanut butter chocolate chips
1 (10-12 oz) bag semisweet chocolate chips
4 1/2 cups white granulated sugar
14 oz jar marshmallow creme
1 1/2 cups evaporated milk
1/2 cup butter
2 teaspoons vanilla extract

Directions:
Line a 13X9″ baking pan with aluminum foil.  Using two large bowls, pour peanut butter chips in one and chocolate chips in the other.  Combine the sugar, marshmallow creme, evaporated milk, and butter in a large saucepan and cook over medium heat. When the mixture comes to a boil, stir continuously for 5 minutes (let it boil the entire time you are stirring). Remove the saucepan from heat and add vanilla. Quickly stir to incorporate.

Carefully pour half of the mixture into the peanut butter chips bowl and the other half into the chocolate chips bowl. Stir the peanut butter chips until they are melted and the mixture is smooth (it will take a minute or two). Pour the peanut butter mixture into the bottom of the pan lined with foil.

Now stir the chocolate chip mixture until the chips are completely melted and the mixture is smooth. Carefully pour and spread on top of the peanut butter layer in the pan (I slowly and carefully poured mine on top, then used a spatula to spread it to the edges- if you pour too quickly, it will make holes and dents in your fudge).

Let the fudge cool for a couple of minutes before placing in the fridge. Allow fudge to set up for 2-4 hours, then cut and serve.
 Original recipe from here

Candy Bar Fudge

Ingredients:
  • 1 cup milk chocolate chips
  • 1/4 cup creamy peanut butter
  • 4 tablespoons butter
  • 1 cup sugar
  • 1/4 cup evaporated milk
  • 1 1/2 cups marshmallow crème
  • 1/4 cup creamy peanut butter
  • 1 teaspoon vanilla extract
  • 1 cup salted peanuts
  • 14-oz. bag caramels, unwrapped
  • 1/4 cup evaporated milk
  • 1 cup milk chocolate chips
  • 1/4 cup creamy peanut butter
Instructions:
  1. Coat a 9x13 pan with cooking spray and set aside.
  2. FIRST LAYER: In a small bowl, combine chocolate chips and peanut butter. Heat in the microwave in two 30-second intervals, stirring after each interval. Stir until creamy and pour in an even layer into the bottom of the prepared pan. Place pan in freezer.
  3. SECOND LAYER: In a medium saucepan, melt the butter over medium heat. Stir in the sugar and evaporated milk and bring to a boil. Cook, stirring constantly, for 3 minutes. Remove from heat and immediately stir in marshmallow crème, peanut butter and vanilla. Add peanuts and stir until incorporated. Pour mixture over the chocolate layer from the freezer and spread evenly. Place back in freezer.
  4. THIRD LAYER: Add the caramels and evaporated milk to a small saucepan. Cook over medium-low heat, stirring constantly, until caramel is melted and smooth. Remove pan from freezer and pour caramel over the second layer. Place back in freezer.
  5. FOURTH LAYER: In a small bowl, combine chocolate chips and peanut. Heat in the microwave in two 30-second intervals, stirring after each interval. Stir until creamy and pour in an even layer onto the top.
  6. Refrigerate for a minimum of 1 hour and cut into squares when ready to serve. Keep refrigerated.
Original Recipe from here

S'mores Fudge Bars

This is a more complicated recipe, and it takes some time.  That being said, it is WELL worth it.  This is one of Joe's favorite desert, and I think a lot of it has to do with the fact that all of it is made from scratch.  It is a very rich desert but is so full of flavor.  The homemade marshmallow really take the desert over the top.  It is such an important step in the process of making the recipe!  I will forewarn you that it can get quite messy making marshmallows with all of the stickiness and can be a pain to clean, but well worth it!  Enjoy!


S'mores Fudge Bars

Ingredients:

Crust:
18-20  full graham crackers
1/4 cup granulated sugar
1/2 teaspoon salt
8 tablespoons unsalted butter, melted

Fudge filling:
2 cups semisweet chocolate chips
1 (14 ounce) can sweetened condensed milk

Marshmallow topping:
2 large egg whites
1/4 teaspoon cream of tartar
3/4 cup granulated sugar
1/2 cup light corn syrup
1/4 cup water
1/4 teaspoon salt
1 1/2 teaspoons vanilla extract

Directions:

For the crust:
Preheat the oven to 350°F. Line an 8x8-inch baking pan with foil. Place the graham crackers, sugar, and salt in the bowl of a food processor and pulse until finely ground. Add the melted butter and pulse until the mixture is moistened. Press the mixture into the bottom of the prepared baking pan. Bake for 10 minutes. Remove to a cooling rack and let cool completely.

For the filling:
In a small saucepan set over medium-low heat, combine the chocolate chips and condensed milk. Heat until the mixture is melted, thick, and smooth, stirring constantly. Pour over graham cracker crust. Place in the refrigerator while making the marshmallow topping.

For the marshmallow topping:
In the bowl of an electric mixer fitted with the whisk attachment, beat the egg whites and cream of tartar until soft peaks form.

Meanwhile, in a small saucepan set over medium-high heat, combine the sugar, corn syrup, water, and salt. Bring the mixture to a boil and continue to cook until a candy thermometer registers exactly 240°F.  Immediately remove from heat. Turn the mixture on low speed and carefully and gradually drizzle the syrup into the egg whites. Increase speed to medium-high and beat until the mixture is thick and glossy and looks like marshmallow fluff, about 7 minutes longer. Add in the vanilla and beat until combined.

Spread the marshmallow topping evenly over the chocolate fudge layer. Use a kitchen torch to gently torch the marshmallow layer until lightly golden. Alternatively, place the pan under the broiler and broil for 1 minute, or until lightly golden.

Refrigerate the pan for at least 1 hour before cutting into squares and serving. The squares can be stored in an airtight container in the refrigerator for up to 5 days.

Original Recipe from here

Soft and Chewy White Chocolate Cream Cheese Cookies

I have been making the chocolate chip recipe for quite some time now, and it literally makes the softest, chewy cookies ever!  Since they have been Joe's go to request for desert, I decided it was about time to switch it up just a bit.  It is the same recipe, just white chocolate based instead of milk chocolate!  Enjoy!

Soft and Chewy White Chocolate Cream Cheese Cookies

Ingredients:

1/2 cup (1 stick) unsalted butter, softened
2 ounces (about 1/4 cup ) cream cheese, softened
3/4 cup light brown sugar, packed
1/4 cup granulated sugar
1 large egg
2 teaspoons vanilla extract
2 cups all-purpose flour
one 3.5-ounce packet instant white chocolate or cheesecake-flavored pudding mix
1 teaspoon baking soda
2 cups white chocolate chips

Directions:

  1. In the bowl of a stand mixer combine the butter, cream cheese, sugars, egg, vanilla, and beat on medium-high speed until creamed and well combined, about 4 minutes
  2. Stop, scrape down the sides of the bowl, and add the flour, dry pudding mix, baking soda, and beat on low speed until just combined, about 1 minute.
  3. Stop, scrape down the sides of the bowl, and add the white chocolate, and beat on low speed until just combined, about 30 seconds.
  4. Using a  1/4-cup measure, or your hands, form approximately 13 to 14 equal-sized mounds of dough, roll into balls, and flatten slightly.
  5. Place mounds on a large plate or tray, cover with plastic wrap, and refrigerate for at least 3 hours, up to 5 days. Do not bake with unchilled dough because cookies will bake thinner, flatter, and be more prone to spreading.
  6. Preheat oven to 350F, line a baking sheet. Place dough mounds on baking sheet, spaced at least 2 inches apart and bake for about 11 minutes, or until edges have set and tops are just set, even if slightly undercooked, pale, and glossy in the center; don't overbake. Cookies firm up as they cool. Allow cookies to cool on baking sheet for about 10 minutes before serving.
     Original recipe from here

    Monday, July 21, 2014

    Soft and Chewy Chocolate Chip Cookies

    I have made a lot of chocolate chip cookie recipes in my life.  Most of the time when I get the urge to make them, I simply Google a recipe.  None of them ever disappointed, but none of them ever stood out either. A while back, I was making ice cream sandwiches from scratch and I ran across a recipe that used vanilla pudding, so I decided to try it.  I immediately froze the cookies after they cooled so that I could make the sandwiches and never even thought to try them unfrozen.  Needless to say, we knew they were awesome cookies even when frozen, because they were not hard as a rock.  I made sure that the next time we were at the store we picked up pudding so that I could make them again when the urge hit.  Well, I wanted to make something this weekend that could last a while and was simple and quick to make.  I struggled finding the recipe again, but finally ran across it again.  Now that I have found it again, and successfully made the softest, best tasting chocolate chip cookies ever, I want to make sure to put it down on the blog so it will never get lost again.

    I know it sounds silly to say these are amazing, but they really are.  For some reason, the vanilla pudding makes them super soft for many days to follow.  The taste of the vanilla stands out to make them rich and full of flavor.  The one thing that always throws me off is that the cookie dough is super thick, so don't be alarmed by that.  I think it keeps the cookies a bit thicker as well when cooking which is amazing.  So, here we go!  Enjoy!

    Ingredients:

    3/4 cup unsalted butter, softened at room temperature(1 1/2 sticks)
    3/4 cup light brown sugar, packed
    1/4 cup granulated sugar
    1 large egg
    1 teaspoon vanilla extract
    2 cups all-purpose flour
     3.5-ounce packet instant vanilla pudding mix (not sugar-free and not 'cook & serve')
    1 teaspoon baking soda
    pinch salt
    12 ounce bag (2 cups) semi-sweet chocolate chips (or white chocolate, peanut butter chips, whatever you would like)

    Directions:

    1. In a stand mixer, combine the butter, sugars and beat on high until fully incorporated.
    2. Add egg, vanilla, and mix until they are incorporated.  Try not to over mix.
    3. Stop, scrape down the sides of the bowl, and add the flour, pudding mix, baking soda, salt, and beat on low speed until just combined, about 1 minute.
    4. Stop, scrape down the sides of the bowl, and add the chocolate chips, and beat on low speed until just combined, about 30 seconds.
    5. Using a 1/4-cup measure, or your hands, form approximately 14 equal-sized mounds of dough, roll into balls, and flatten slightly. Tip - Strategically place a few chocolate chips right on top of each mound of dough by taking chips from the underside and adding them on top.
    6. Place mounds on a large plate or tray, cover with plasticwrap, and refrigerate for at least 2 hours, up to 5 days. Do not bake with unchilled dough because cookies will bake thinner, flatter, and be more prone to spreading.
    7. Preheat oven to 350F, line a baking sheet with a Silpat or spray with cooking spray. Place dough mounds on baking sheet, spaced at least 2 inches apart and bake for about 14 minutes, or until edges have set and tops are just set, even if slightly undercooked, pale, and glossy in the center; don't overbake. Cookies firm up as they cool. Allow cookies to cool on baking sheet for about 10 minutes before serving.
    8. Cookies will keep airtight at room temperature for up to 1 week or in the freezer for up to 6 months. Alternatively, unbaked cookie dough can be stored in an airtight container in the refrigerator for up to 5 days, or in the freezer for up to 4 months, so consider baking only as many cookies as desired and save the remaining dough to be baked in the future when desired.
    Recipe adapted from here